J-Techno for all information of technology in the world.

WORLD

Karya Ilmiah Lingkungan Bisnis


Karya Ilmiah Lingkungan Bisnis 

Berkarya Mulai dari Hal Kecil


Karya Ilmiah Ini Disusun Berdasarkan Tugas Akhir Individu
Mata Kuliah Lingkungan Bisnis


Nama : Sang Adi Gangsar R
Nim : 14.11.8284
Kelas : S1.TI.11
Kelompok : I
TAHUN AJARAN 2014/2015


ABSTRAK


Di Jaman era teknologi modern seperti ini banyak hal - hal yang dapat di jadikan peluang bisnis. hal ini dapat dilakukan untuk mengembangkan teknologi khususnya yang ada di indonesia, dengan cara berkarya mulai dari hal yang kecil. hal ini dapat membantu manusia yang awalnya susah supaya menjadi lebih mudah. teknologi yang di kembangkan di indonesia ini masih sangat sedikit , maka ada perlunya untuk mengembangkanya atau membuat teknologi baru. maka peluang bisnis iniliah yang diinginkan untuk negara indonesia. Memang tidak mudah membuat bisnis seperti ini, tetapi tidak ada salahnya untuk mencoba. adapun website yang menawarkan tentang cara membuat teknologi baru seperti: duino4projects.com, makezine.com, instructables.com dan masih banyak lagi. Suatu teknologi baru dapat menghasilkan untung yang sangat besar, apalagi sudah masuk ke pemasaran internasional. Maka jika anda punya ide atau proyek teknologi dapat anda ikut sertakan mulai dari lomba - lomba, atau dapat di ikut sertakan di makeit.intel.com .


ISI

Era gelobalisasi ini banyak persaingan dalam hal teknologi bisnis, dengan perubahan yang cepat, kompleks, global, sangat kompetitif dan terfokus pada pelanggan. Lebih jauh lagi . Kita harus bereaksi dengan cepat untuk menghadapi kendala dan peluang yang muncul dari lingkungan bisnis baru ini. Teknologi inilah yang masih banyak peluang bisnis yang dapat diharapkan asal memiliki kemauan, strategi yang kuat serta kemampuan yang cukup.  banyak sekali yang berlomba - lomba membuat teknologi baru yang di lakukan di seluruh dunia. membuat teknologi baru memberikan kepuasan tersendiri dari segi ketrampilan, pendapatan, pengalaman, dan kerjasama. teknologi yang di cari saat ini adalah. teknologi untuk orang - orang yang mempunyai keterbatasan fisik. hal ini diciptakan agar dapat mempermudah orang - orang yang mempunyai keterbatasan fisik tersebut.

A. Pengertian
Dalam pemahaman perkembangan teknologi cakupanya tidak terlepas dalam pembahasannya meliputi aspek riset/penelitian dan pengembanganya. Produk riset tersebut dapat berupa data, informasi dan teknologi, sedangkan pengembangan berupa aplikasi teknologi pada skala operasional / bisnis. Produk teknologi dalam berbagai bidang, baik langsung maupun tidak langsung, pada akhirnya bermuara pada penguatan ekonomi dan ketahanan bangsa dan negara. Untuk mencapai muara tersebut maka akan terlibat proses-proses atau kegiatan antara lain invensi, penerapan, inovasi, difusi teknologi, alih teknologi, dan nano teknologi. Untuk memahami istilah-istilah tersebut, pengertianya seperti uraian di bawah ini. Ilmu pengetahuan adalah rangkaian pengetahuan yang digali, disusun, dan dikembangkan secara sistematis dengan menggunakan pendekatan tertentu yang
dilandasi oleh metodologi ilmiah, baik yang bersifat kuantitatif, kualitatif, maupun eksploratif untuk menerangkan pembuktian gejala alam dan/atau gejala kemasyarakatan tertentu. Teknologi adalah cara atau metode serta proses atau produk yang dihasilkan dari penerapan dan pemanfaatan berbagai disiplin ilmu pengetahuan yang menghasilkan nilai bagipemenuhan kebutuhan, kelangsungan dan peningkatan mutu kehidupan manusia. Invensi adalah suatu ciptaan atau penemuan baru yang belum ada sebelumnya yang memperkaya kebaikan serta dapat dipergunakan untuk menyempurnakan
atau memperbarui ilmu pengetahuan dan teknologi yang sudah ada. Inovasi adalah kegiatan penelitian, pengembangan, dan/atau perekayasaan yang bertujuan mengembangkan perepan praktis nilai dan konteks ilmu pengetahuan yang baru, atau cara baru untuk menerapkan ilmu pengetahuan dan teknologi yang telah ada kedalam produk atau proses produksi. Difusi teknologi adalah kegiatan adopsi dan penerapan hasil inovasi secara lebih ekstensif oleh penemunya dan/atau pihak-pihak lain dengan tujuan untuk meningkatkan daya guna potensinya. Alih teknologi adalah pengalihan kemampuan memanfaatkan dan mengusai ilmu pengetahuan teknologi antar lembaga, badan, atau orang baik yang berada di lingkungan dalam negeri maupun yang berasal dari luar negeri ke dalam negeri dan sebaliknya.
Nanoteknologi adalah suatu teknologi yang dihasilkan dari pemanfaatan sifatsifat molekul atau struktur atom apabila berukuran nanometer. Apabila molekul atau struktur atom dapat dibuat dalam ukuran nanometer (1-100 nm), maka akan menghasilkan sifat-sifat yang sangat mencengangkan, karena sangat berbeda dari sifat-sifat yang diperoleh jika material atau bahan tersebut dalam ukuran makroskopik (orde micrometerataupun kast mata). Sifat-sifat baru inilah yangdimanfaatkan untuk keperluan teknologi, sehingga teknologi itu disebut nanoteknologi. 

B. Contoh Jenis teknologi yang di kembangkan
  • Self Driving


Fitur canggih self-driving pada mobil masih dalam pengembangan. Saat ini beberapa mobil dilengkapi dengan radar, LIDAR, GPS, dan visi komputer. Sistem kontrol canggih ini memberikan informasi sensor gerak untuk memberikan arah jalur navigasi.  


  • PC Khusus Untuk Orang Cacat Penglihatan


Selama ini orang yang kurang upaya atau buta mengalami banyak kesulitan ketika menggunakan komputer PC kosvensional. Walaupun sistem operasi yang digunakan telah dilengkapi dengan peralatan bantuan untuk orang cacat penglihatan seperti peralatan Narrator pada Microsoft Windows, walupun begitu terdapat banyak keterbatasan kerana orang tidak mempunyai penglihatan tidak boleh melihat tampilan visual.


rekaan terbaru dari Siafu PC memberikan kesempatan kepada orang yang mempunyai kecatan penglihatan (buta) untuk merasakan pengalaman yang lain dalam menggunakan komputer.

Alat ini benar-benar mengubah cara orang buta berinteraksi dengan komputer, yaitu melalui sentuhan secara langsung.


  • Mata Bionik

Sistem implan retina benar-benar bisa membantu tuna netra untuk melihat lagi dan para ilmuwan percaya ada manusia yang akan bersedia untuk percobaan dalam waktu setahun atau lebih. Anda bisa melihat prototype mata bionik yang dibuat oleh MIT pada gambar di atas. Mata bekerja dengan kacamata khusus dilengkapi kamera kecil yang menampilkan data visual di bawah retina yang dapat merangsang saraf optik sehingga memungkinkan tuna netra dapat melihat.


  • Layar TV pada Retina
Para peneliti di University of Washington telah mengembangkan semi-transparent LED yang bisa diintegrasikan dengan kontak lensa. Array LED dapat menampilkan gambar di atas retina yang fokus dan sempurna. Bila layar dimatikan, Array LED tidak terlihat sehingga kontak dapat dipakai setiap saat.


C. Tahapan pengembangan usaha Teknologi

Tahapan – tahapan yang dilakukan dalam proses pengembangan usaha Teknologi yaitu :
  • Ide Usaha
  • Kelayakan (business plan)
  • Implementasi (business process)
  • Prestasi


D. Faktor utama sebelum memulai usaha

Terdapat beberapa faktor utama yang harus dipertimbangkan sebelum memulai usaha , yaitu :
  • Faktor kelayakan pasar
  • Faktor kesukaan
  • Faktor keahlian atau familiaritas
  • Faktor dana
  • Faktor bahan baku
  • Faktor sumber daya manusia dan teknologi
  • Faktor kepribadian


E. Perkembangan bisnis TI dunia

Mungkin setiap orang saat ini sangat bergantung sekali kepada komputer, keberadaan komputer saat ini bukan lagi merupakan barang mewah, Alat ini sudah digunakan di berbagai bidang pekerjaan, termasuk dalam dunia pendidikan.


Pengenalan Teknologi Informasi dan Komunikasi (TIK), diharapkan dapat membuat perubahan pesat dalam kehidupan yang mengalami penambahan dan perubahan dalam penggunaan beragam produk TIK.

Melalui perangkat Teknologi Informasi dan Komunikasi, kita bisa mencari, mengeksplorasi, menganalisis, dan saling tukar informasi secara efisien dan efektif. TIK akan memudahkan kita, mendapatkan ide dengan cepat dan bertukar pengalaman dari berbagai kalangan. Mulai dari anak-anak hingga dewasa, wanita pun begitu, sekarang, tidak sedikit negara yang menyerahkan teknologi informasi dan komunikasi kepada wanita, wanita dinilai lebih cekatan dalam mengembagkan bisnis di bidang TIK.

Dengan demikian, diharapkan dapat mengembangkan sikap inisiatif dan kemampuan belajar mandiri, sehingga kita dapat memutuskan dan mempertimbangkan sendiri kapan dan dimana penggunaan TIK secara tepat dan optimal, termasuk implikasinya saat ini dan di masa yang akan datang.

Teknologi Informasi dan Komunikasi mencakup dua aspek, yaitu Teknologi Informasi dan Teknologi Komunikasi. Teknologi Informasi, meliputi segala hal yang berkaitan dengan proses, penggunaan sebagai alat bantu, manipulasi, dan pengelolaan informasi.

Sedangkan Teknologi Komunikasi merupakan segala hal yang berkaitan dengan penggunaan alat bantu untuk memproses dan mentransfer data dari perangkat yang satu ke lainnya.

Oleh karena itu, Teknologi Informasi dan Teknologi Komunikasi adalah suatu padanan yang tidak terpisahkan yang mengandung pengertian luas tentang segala kegiatan yang terkait dengan pemrosesan, manipulasi, pengelolaan, dan transfer/pemindahan informasi antar media.

TIK pun sekarang digunakan di bidang ekonomi, upaya keras dari pemerintah untuk membangun sarana dan fasilitas teknologi informasi dan telekomunikasi di Indonesia bertujuan untuk memfasilitasi kegiatan interakasi ekonomi-sosial masyarakat dan sektor produksi. Oleh sebab itu pemerintah berupaya keras untuk memperluas jangkauan layanan telekomunikasi sampai ke seluruh lapisan masyarakat. Instrumen yang digunakan selama ini adalah melalui badan usaha operator telekomunikasi yang melakukan usaha/bisnis layanan telekomunikasi melalui layanan fixed line, seluler, atau satelit. Secara teknis cara ini telah berhasil membuat fasilitas telekomunikasi menjangkau seluruh wilayah geografis Indonesia (dari Sabang sampai Merauke). Namun keterjangkauan teknis-geografis ini tidak membuat sistem telekomunikasi terjangkau bagi masyarakat, yang merupakan sasaran utama.


REFERENSI

http://achanges.files.wordpress.com/
http://amoebasystem.com/
http://gadget.gopego.com/


Bird Feeder Monitor

Leave a Comment
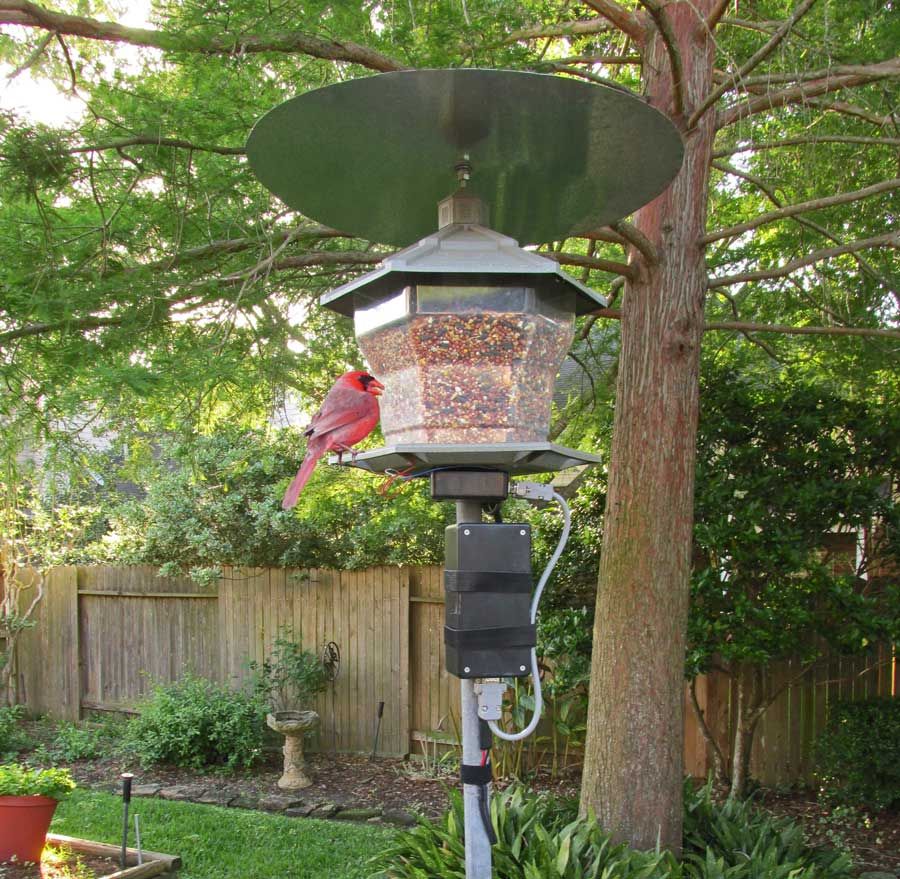
This is a project to monitor the number of birds that visit my bird feeder, as well as record the amount of time spent feeding. I used an Arduino Yún and a capacitive touch sensor, Adafruit CAP1188, to detect and record the birds feeding. On a routine basis, the accumulated data is sent to a Google Docs spreadsheet to record the number and time spent by the birds visiting the feeder.
Data is only transmitted during a set period of time prior to sunrise and after sunset.

Step 1: Step 1: Parts

Bird Feeder Monitor using Arduino
These are a list of the parts that I used to assemble my project. You could use a variety of project boxes to create your project, but these are the items I had on hand at the time.
1 6x3x2″ Project Enclosure
1 3x2x1″ Project Enclosure
1 roll 1/4″ Copper Foil Tape
1 CAP1188 8-Key Capacitive Touch Sensor
1 Arduino Yun
1 micro-SD card
2 DB-9 male connectors
2 DB-9 female connectors
1 Bird Feeder (CedarWorks Plastic Hopper Bird Feeder)
1 Tail Light connector from automotive supply store

Step 2: Step 2: Wiring

The Arduino Yun and the CAP1188 are wired to provide a hard reset of sensor at startup. There are other capacitive touch sensors available with either one, five or eight sensors. I chose eight because my bird feeder has six sides.
Wiring:
CAP1188 SDA == Yún Digital 2
CAP1188 SCK == Yún Digital 3
CAP1188 RST == Yún Digital 9
CAP1188 VIN == Yún 3.3V or 5V
CAP1188 GND == Yún GND
CAP1188 C1-C8 == Connect to wires on each perch
Power for the Arduino was provided externally, by running a wire underground from my garage, and up through the pipe used as the bird feeder stand. The wire was connected to a 5-VDC power supply in the garage. This project should work with batteries, but I didn’t want the hassle of changing batteries on a routine basis.
I constructed a 16″ long cable with DB-9 connectors on both ends to connect the Project Box with the Arduino Yun and the box containing the CAP1188. The capacitive sensor needs to be located as close to the perches as possible.

Step 3: Step 3: Installing Python Packages and Scripts

The CAP1188 requires that you download and install the libraries for this sensor. The library can be found at the following site:
https://github.com/adafruit/Adafruit_CAP1188_Library/archive/master.zip
Instructions for installing the library and examples are located in a README.txt file within the zip container.
This program monitors the sunrise & sunset for your specific location, and begins counting and timing at a specified time before sunrise and for an equal amount of time after sunset. Before and after that time, no data is sent to your spreadsheet. This project uses a python script to read the sunrise and sunset information from Yahoo! weather each evening or at startup get these times.
The following python library needs to downloaded and installed on the Arduino Yún.
python-weather-api
pywapi – https://code.google.com/p/python-weather-api/
Instructions for installing this library is located at the above website.
Python Scripts
The location ID in the ‘getastonomy.py’ python script needs to be modified to include your location. It is currently configured for Missouri City, Texas. One way to find your ID is to go to the following website:
http://www.intellicast.com/
Enter your location, and your location ID will appear as part of the URL address. Replace the USTX0905 in the line of the script with your location ID.
result = pywapi.get_weather_from_yahoo(‘USTX0905‘,’imperial’)
This will allow the script to fetch the sunrise and sunset for your location. Instructions for modifying ‘sendgdocs.py’ are located in Step 6.
Once both scripts have been modified you must move them onto the micro-SD card directory ‘/mnt/sda1/’ of the Arduino Yun.

Step 4: Step 4: Wiring the Bird Feeder

Each of the perches on the feeder was covered with 1/4″ wide self adhesive copper foil tape. A small hole was drilled through the tape and perch, and a wire was soldered to the foil tape and routed beneath the feeder.
Note: With the bird feeder shown above, I recommend a gap between the ends of each foil stripe of 1 1/4″ – 1 1/2″. I discovered that the larger birds, such as grackles and doves, are capable of touching two foil strips at the same time if they are placed to close together.
A block of wood was shaped and glued to the bottom of the feeder to provide a level area to mount the Project Box containing the CAP1188. Velcro tape was applied to the Project Box as well as the wooden block to provide a means of attaching.
In order to refill the bird feeder, I unplug the power inside the garage. Next, I disconnect the DB-9 connector from the Project Box attached to the bottom of the feeder, which allows me to lift the feeder off the pipe with the Project Box still connected to the bottom. Once the feeder has been refilled, I place it back on the pipe stand; connect the DB-9 cable; and plug in the power.
Bird Feeder Monitor using Arduino circuit

Step 5: Step 5: Creating a Google Doc Form

In order to send data a Google Docs spreadsheet, you must first create a Form with all of the required fields. In my example, I have six ‘cnt’ fields and six ‘time’ fields that are integer input. For example, the fields are named ‘cnt1′, ‘time1′, ‘cnt2′, ‘time2′, etc. Once your finished with the Form, you click “View live form” to see the finished form. While viewing the Form, right click the page and select “View page source”. Search and find all of the HTML “input” fields in the source code. Make a note of the name for each of the fields you entered on the form. This information is needed to create your Scenario in PushingBox.

For more detail: Bird Feeder Monitor using Arduino


This Post / Project can also be found using search terms:

  • arduino based home automation projects
  • arduino bird
  • arduino projects automation
  • Bird Feeders with monitors for hearing brids in inside

Source : duino4projects.com

GPS Tracking System

Leave a Comment
This was easily the most time I’ve spent producing an Arduino Tutorial. I’ve been sporadically walking around NYC with this GPS for weeks as I’ve tweaked the code and gotten it just right.
Arduino GPS Tracking System

Attributes

Thanks to Jeremy , for this articles
If it wasn’t obvious from the title, this tutorial will teach you how to use an arduino paired with a GPS Module and an SD Card Module to log your latitude and longitude over the course of a day. As a bonus, I’ll also show you how to easily overlay this data onto a map using services like Google Earth and Google Fusion Tables. I added a short “history lesson” to this episode to explain how GPS came to be; it’s the first time I’ve done that, so please let me know if you like the extra knowledge. Grab some popcorn and your Arduino, because this tutorial is pretty long – GPS is complicated! The schematics, programs, parts list, sample data, and important links are available for below.


I used the tinyGPS library to decode the NMEA GPS Data. Cooking-Hacks generously supplied both the GPS shield and SD Card shield that I used in this tutorial.
Arduino GPS Tracking System schematic

You can download the files associated with this episode here: Arduino Tutorial 15 Files


Major Components in Project

PARTS /SOFTWARE   LIST

1.   Arduino Mega2560: http://www.newark.com/arduino/a000047/arduino-mega2560-board/dp/13T9286
2.   USB Cable: http://www.newark.com/pro -signal/usb2 -102b/cable -usb2 -0-a-b -blue -2m/dp/38K9260
3.   Arduino Software:  http://arduino.cc/en/Main/Software
4.   TinyGPS Arduino GPS Library: http://arduiniana.org/libraries/tinygps/
5.   Google Earth:  http://www.google.com/earth/index.html
6.   Spreadsheet Software: Microsoft Excel or Open Office: http://www.openoffice.org/
7.   Jumper Kit:  http://www.newark.com/3m/923351- i/pcb-accessories/dp/65F2290
8.   Cooking Hacks GPS Shield:  http://www.cooking- hacks.com/index.php/gps-module-for-arduino.html
9.   Cooking Hacks GPS Antenna:  http://www .cooking -hacks.com/index.php/internal-gps-antenna.html
10.  Cooking Hacks SD Card Shield w/ SD Card: http://www.cooking-hacks.com/index.php/microsd-2gb-module-for-arduino.html
11.  Enclosure: http://www.newark.com/enclosures_enclosures
12.  9V Battery Holder:  http://www.sparkfun.com/products/10512
13.  Power Button  or Toggle  Switch: http://www.sparkfun.com/products/9276

For more detail: Arduino GPS Tracking System


This Post / Project can also be found using search terms:

  • arduino gps tracker
  • arduino gps projects
  • arduino gps tracker google maps
  • arduino gps android

Source : duino4projects.com

26 Tech DIY Projects For The Nerd In All Of Us

Leave a Comment

1. USB Locket

USB Locket
You can buy this particular version here, or create your own with a large enough locket. They are plentiful on Esty and more cost effective.

2. Remote Control Part Jewelry

Remote Control Part Jewelry
Directions and more ideas here.

3. iPad/iPhone Stylus

4. Kitchen Tablet Holder

Kitchen Tablet Holder
This DIY was inspired by a much more expensive Pottery Barn piece. It’s perfect for reading recipes or watching cooking shows in the kitchen!

5. Audio Earmuffs

Audio Earmuffs
Instructions here.

6. Phone and Tablet Cases

Phone and Tablet Cases

7. USB Safety Pin

USB Safety Pin
This one is just a concept, but you could certainly create your own with a little super glue and a steady hand.

9. Chocolate iPhone!

Chocolate iPhone!
Directions here.

10. Crochet Headphone Covers

Crochet Headphone Covers
More subtle than the earmuffs, but equally fun. Directions here.

12. Altoid Can Solar USB Charger

Altoid Can Solar USB Charger

14. Wooden iPad Stand

Wooden iPad Stand
Just a table saw and a block of wood at work here.

15. Cross-Stitch iPhone Case

Cross-Stitch iPhone Case
While you’ll have to purchase the case itself, you can DIY a million designs with just a little thread!

16. A Sneaky Sawed-Off USB drive

A Sneaky Sawed-Off USB drive
So simple and so clever!

17. Touchscreen Gloves

Touchscreen Gloves
Way cheaper than store-bought tech gloves! Instructions here.

18. QR Code Valentine

QR Code Valentine
This cute needlepoint actually scans to display a message of up to 250 characters!

19. Headphone Cord Keepers

Headphone Cord Keepers
This adorable DIY Christmas gift could be easily made in any shape or color.

20. Bicycle Horn iPhone Speaker

Bicycle Horn iPhone Speaker
“The bike horn (with it’s noise maker removed) had just the right amount of threading on the end to screw into the soft plastic hole, and be flush with the inside of the PVC. It sits directly in front of the tiny mono speaker. Leaving the ends of the PVC open allows for a more expansive sound and lets more treble escape. The weight of the horn keeps the phone from tipping back.”

21. Floppy Disk USB Drive

Floppy Disk USB Drive
Do it yourself with this handy video.

22. Motherboard Christmas Ornament

Motherboard Christmas Ornament

24. Slide-on Macro Lens for iPhone

Slide-on Macro Lens for iPhone
This DIY is much more affordable than a store-bought macro lens, which run around $60.

25. PVC Pipe Laptop Stand

PVC Pipe Laptop Stand
Super easy and can be customized millions of ways.
26.
A more involved case, but all you need is an X-Acto Knife and some glue.

Source : buzzfeed.com

Make A Digital Clock From Scratch using arduino

Leave a Comment
In some point in the life of every electronics hobbyist the need to make a clock is borned, in my case it was about a month after I soldered my first part on a board, but back then I didn’t have the right tools, parts and knowledge to do such a thing.
But after about 2 years I got all the things I didn’t have back then and I was ready to make my first digital clock, and with all the LEDs I had left over from my 8x8x8 LED cube project I decided to make my own custom LED clock.
So join me and build your own custom LED digital clock powered by our favorite little micro-controller the Arduino.
Make A Digital Clock From Scratch using arduino

Step 1: What Do We Need?

Here is what tools you will need to make this:
1) Soldering Iron.
2) Some solder wire.
3) Small needle nose plier
4) Small cuter
5) Wire striper
I made my clock with a stand alone arduino without the original board because I wanted to make a finished project.
Now here are the parts you will need to make the clock:
1) 130 LEDs.
2) 15 2N4401 transistors.
3) 20 1K resistors.
4) about 10 resistors for the current protection(more detail in step 2). I used 150Ohms.
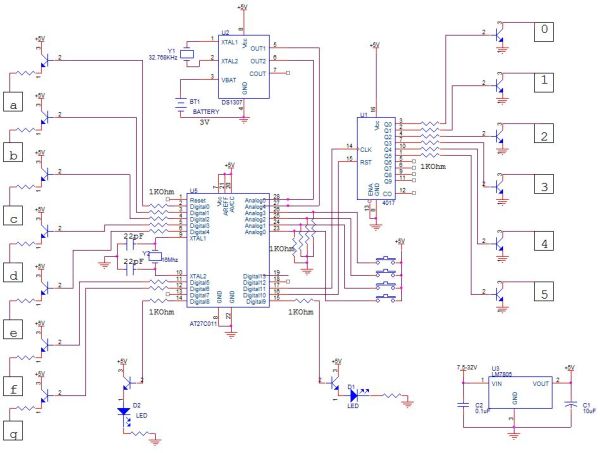
5) DS1307 real time clock IC.
6) one coin cell battery holder.
7) 4 Tact switches.
8) Prefboard (you would like to get along one for the display about 8inch*3inch)
9) ATMega328 with arduino bootloader.
10) A programmer for programing the chip.
11) 7805 voltage regulator.
12) 16MHz crystal.
13) two 22pF caps.
14) 28 pin IC socket for the ATMega328.
15)10 uF cap.
16)0.1 uF cap.
17) 4017 counter
18) 32.768KHz crystal
schematic Make A Digital Clock From Scratch using arduino

Step 2: The Seven Segment Display

The clock is made of six seven segment displays which make up the display.
Each digit made of seven segments and every segment made of 3 LEDs in parallel.
So a simple calculation gives that there are 21 LEDs in each seven segment display.
And all six digits take 126 LEDs.
But as I said In the parts list you will need 130 LEDs and the other 4 LEDs are going to be used as dots that separate the hours, minutes and the seconds.
I made a common cathode display which means the all the negatives leads are connected together.
Now you will need to choose the right resistor for current limiting to 3 LEDs in parallel.
The calculation is simple and gos like this :
R=(Vcc-Vled)/(Iled*3)
R= the resistor value
Vcc = The voltage that is supplied
Vled = the forward voltage on the LED
Iled =the current the LED takes

Step 3: So How It Works?

This kind of display calls for a large amount of pins to power it out so a special technique is needed.
I used multiplexing.
Multiplexing works by switching between the digits one by one very fast and by so creating a illusion that all of the displays are working in the same time.
This works by connecting each segment to the same one on a different digit  and by so you will have only seven segments that are all the same for all the digits.
And you can choose what digit you want to power by connecting the negative leads of the display to ground and sending the data to the positive segment leads.
The scanning of the display is accomplished by the 4017  decade counter because I wanted to save some pins on the arduino, to control it you will need just 2 arduino pins.
The 4017 connects the grounds one by one and by so it scan the display

Major Components in Project

30 LEDs.5 2N4401 transistors.20 1K resistors.1307 real time clock IC.one coin cell battery holdeThis kind of display calls for a large amount of pins to power it out so a special technique is needed.
I used multiplexing.
Multiplexing works by switching between the digits one by one very fast and by so creating a illusion that all of the displays are working in the same time.
This works by connecting each segment to the same one on a different digit  and by so you will have only seven segments that are all the same for all the digits.
And you can choose what digit you want to power by connecting the negative leads of the display to ground and sending the data to the positive segment leads.
The scanning of the display is accomplished by the 4017  decade counter because I wanted to save some pins on the arduino, to control it you will need just 2 arduino pins.
The 4017 connects the grounds one by one and by so it scan the display
For more detail: Make A Digital Clock From Scratch using arduino


This Post / Project can also be found using search terms:

  • arduino LED clock
  • how to make digital clock with led
  • Atmega 328 digital clock circuit
  • scratch2arduino
Source : duino4projects.com